DSE 5.1 Resource Manager, Part 1 – Network Connections Security

Jacek Lewandowski

DSE Resource Manager is a custom version of the Spark Standalone cluster manager. It provides the functionality of a Spark Master when running Apache Spark™ applications with DSE. Since the introduction of Spark in DSE 4.5, DSE Analytics has enhanced the open source Spark Master implementation with: automatic management of the Spark Master and Spark Workers lifecycles; Apache Cassandra®-based high availability; distributed and fault tolerant storage of Spark Master recovery data; and pain-free configuration for client applications. In 5.1, our introduction of the DSE Resource Manager adds even more to our custom integration providing more ease-of-use, security, and stability.
The most significant improvement with DSE 5.1 is the replacement of the Spark RPC communication mechanism between Spark Driver and Spark Master with a DSE native CQL protocol. While this sounds like it is not very important to your user experience with DSE and Spark, I bet you will be surprised by how much this change bolsters the security of Spark applications and DSE. Interested in learning more? This blog post will guide you through this and other changes brought by DSE Resource Manager in DSE 5.1.
OSS Spark Standalone Deployment
A Spark Standalone cluster consists of Spark Master and a set of Spark Workers running on different physical machines. Spark Workers are agents which start and kill the processes called executors per Spark Master requests.
The Spark Master coordinates the workers. It is aware of each worker in the cluster and of the amount of resources it offers. When an application is registered, the master requests new executors to be created on the workers which have enough resources available. Once started the executors connect to the driver and await work. The SparkContext (created in the driver process) can ask these executors to perform tasks. Each executor process belongs to exactly one SparkContext - there is no way that a single executor can run tasks scheduled by multiple SparkContext instances (it is also not really possible to run multiple SparkContext instances in a single driver process unless you separate them into different class loaders). Therefore, whenever we talk about a Spark application, we mean the SparkContext running in the driver process along with its executors.
Security in Spark Standalone deployment
There are multiple communication channels used in Spark cluster:
- RPC - used for exchanging control messages between the driver and the master, the master and the worker, the executor and the driver
- Data - used for sending RDD content between the driver and its executors
- Files - used for sharing classes and files in general - usually SparkContext starts a file server to share JARs for its executors
- Web UI - used by the Spark Master, Spark Worker and Application UIs
Since Spark 1.6 the first three channels have been managed together and support the same security features. The Web UI is managed separately because it uses a different protocol (HTTP) and uses a different mechanism under the hood. The Web UI uses an embedded Jetty server, while the rest of communication channels are implemented directly on top of Netty.
As far as security is concerned, Spark Standalone offers a shared secret based mutual authentication and encryption. In other words, for the whole cluster: the master, all the workers and all applications run on that cluster, there is just a single key used to authenticate any pair of communicating components - the driver talking to the master, the driver talking to its executors and the master talking to the workers. This mechanism allows us to control who has access to the cluster as a whole, but it does not allow us to segregate applications submitted by different users. To be more specific, in DSE 5.0 the users need to authenticate the CQL session to gain access to the only secret key used in the cluster. However, once they did that, they would be able to compromise the communication between any pair of components.
Note that shared secret security is not used for Web UI.

Fig. 1 - Spark Applications and Spark Standalone Cluster Manager communication security (DSE 5.0)
All red line connections are secured with the same key therefore all the parties need to know it
What we improved
All the communication between the driver and the master is now carried through the DSE native transport connection by invoking special CQL commands against any node in the DSE cluster. The node which receives the commands will automatically redirect them to node running Spark Master. The master node then translates the message from the DSE internal format into protocol suitable for Spark. While the end user is not impacted by this change, it provides several significant benefits.
First of all, the communication between the driver and the master does not use shared secret security and is instead secured the same way as any CQL connections to DSE. This means that the user can use plain password authentication, as well as Kerberos or whatever authentication mechanism DSE supports in the future. Like any CQL connection, the connection can use compression, TLS encryption, multiple contact points and so on. Furthermore, since we authenticate users who want to submit Spark applications, we may enable authorization and precisely control who can submit an application via CQL.
Moreover, because the connection between the master and the driver does not use shared secret, the whole Spark cluster is split into two logical parts: (1) resource manager - a master and workers; and (2) application - drivers and their executors. Previously, all the applications used the same secret key as the master did in order to be able to talk to it. Now, since the applications do not use the shared secret to connect to the master, each application can use a different secret key internally securing them independently. In other words:
- The communication between the master and the workers can be confidential - if the security for master-worker communication is enabled, no application can either connect to any master or worker directly (due to mutual authentication) or compromise the communication between them (due to encryption). The cluster will also be protected from a fake worker registration with our master, as well as from a fake master advertising itself to our workers
- The internal application communication between the driver and its executors can be confidential - if the the security for driver-executor communication is enabled, no other applications can either connect to our driver and executor or compromise the communication between the driver and any of its executors
- The communication between the driver and the master can be confidential - if we enable the client encryption in DSE configuration, the connection will be encrypted with TLS
Note that with the introduced changes you can explicitly control the communication of the aforementioned pair of components.
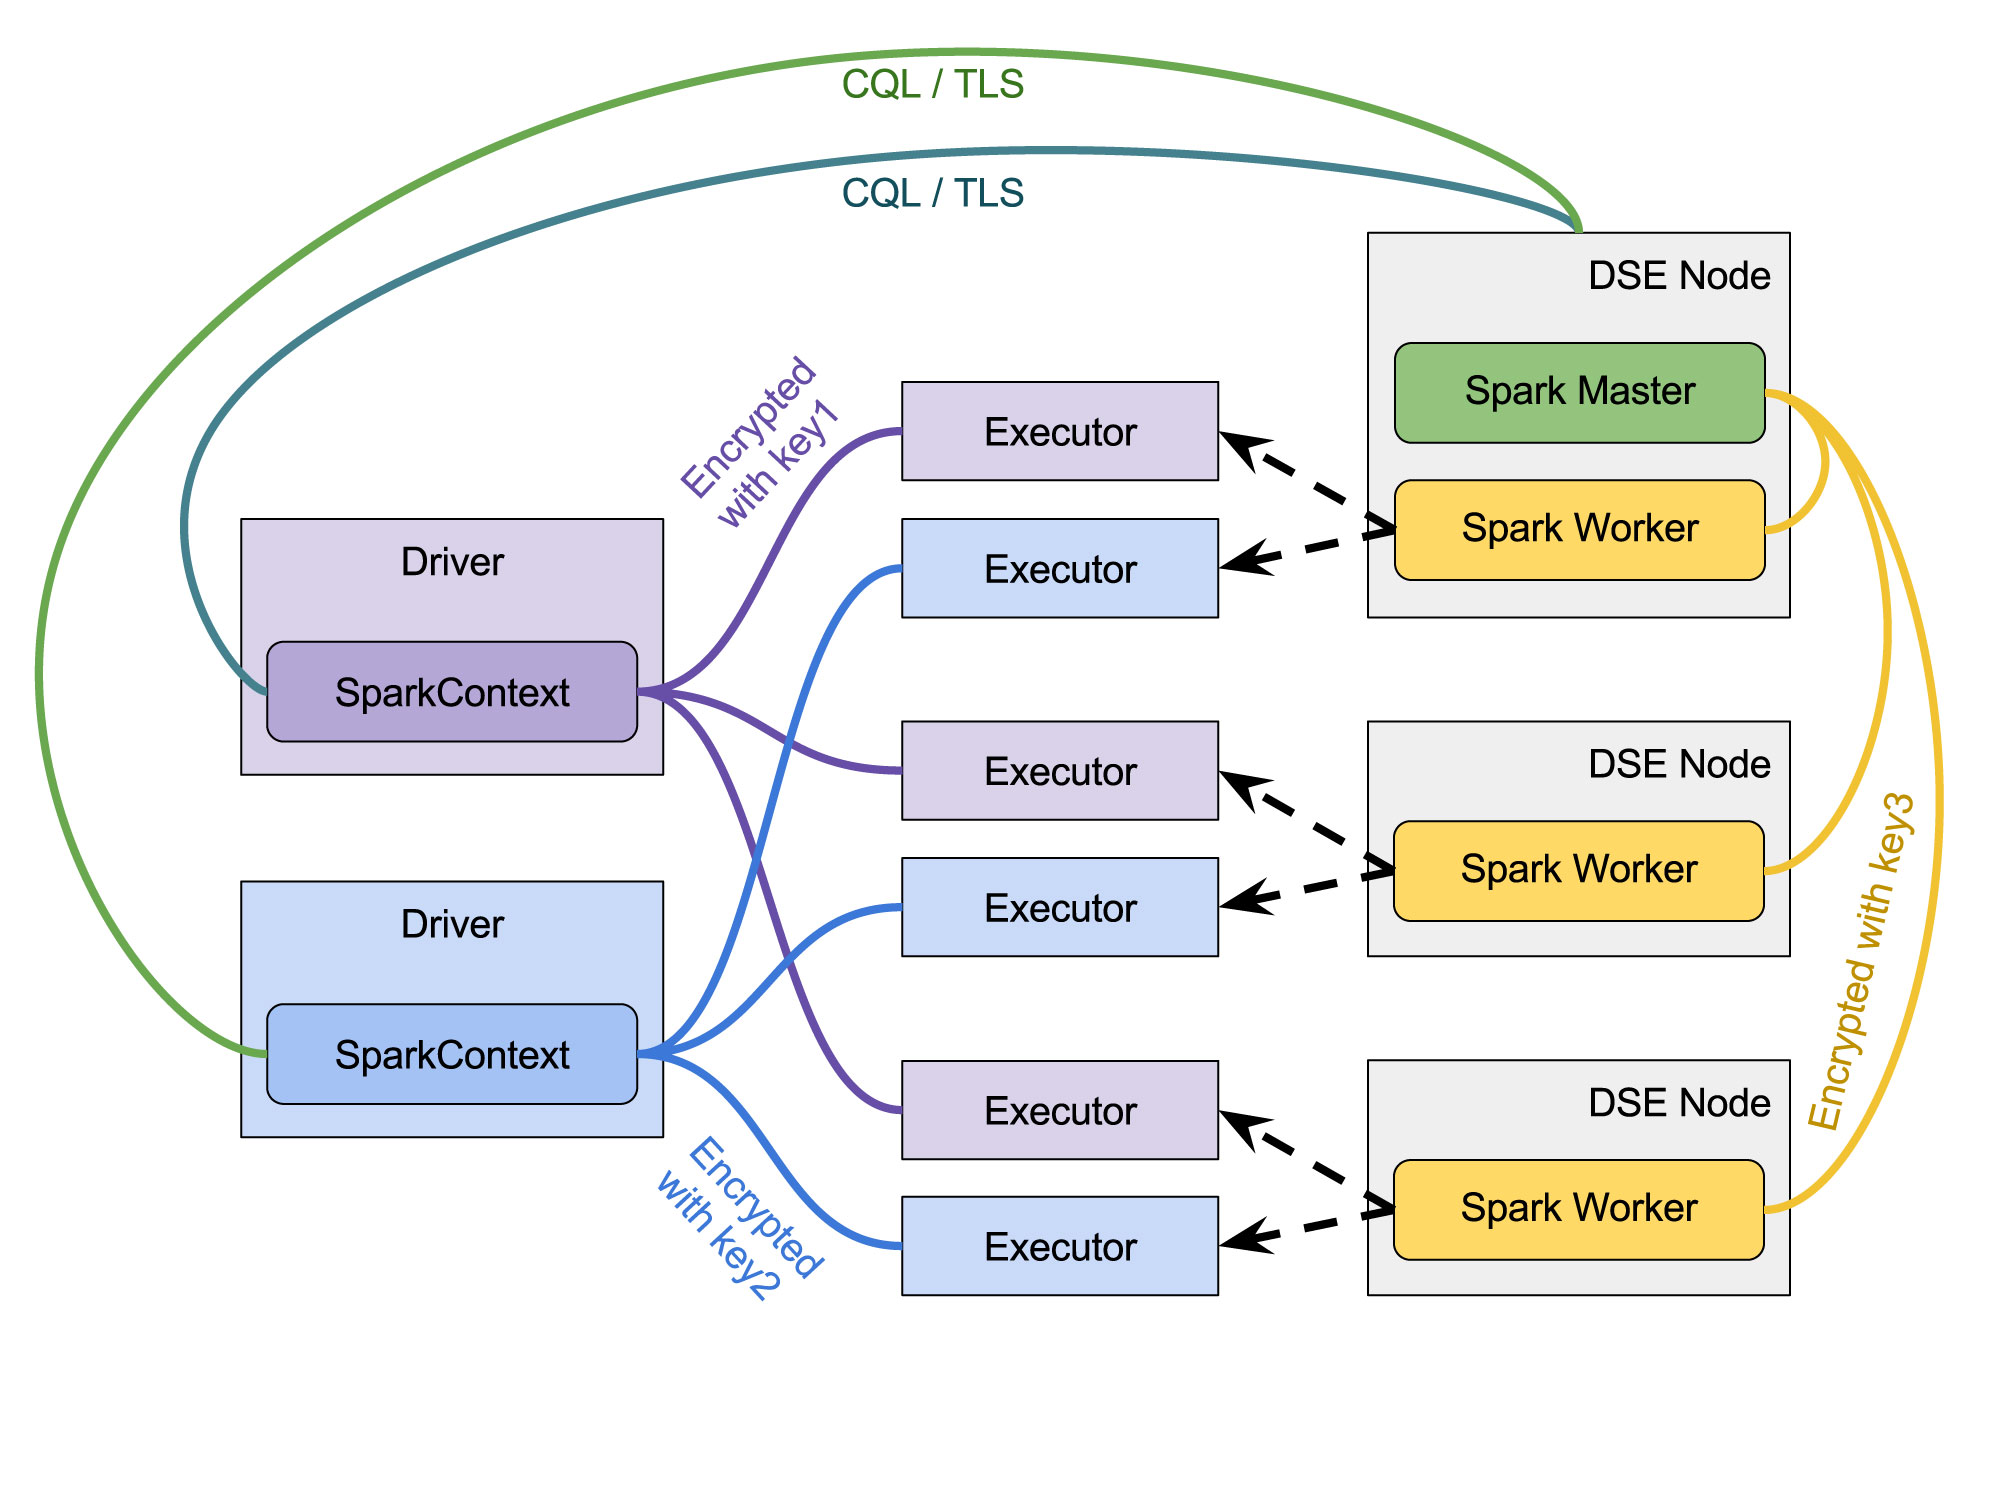

Fig. 2 - Spark Applications and DSE Resource Manager communication security (DSE 5.1)
Different link colors denote different authentication and encryption keys used to secure communication between the components
Internal communication between a master and workers
There are two settings in dse.yaml which allow you to enable mutual authentication and encryption for internal communication. Mutual authentication can be enabled by setting spark_security_enabled to true and encryption additionally requires setting spark_security_encryption_enabled to true. Note that encryption will not work without authentication, there are three combinations possible - no security, authentication only, authentication + encryption.
Internal communication between a driver and its executors
Similarly to master-worker communication, we have the same switches for each individual Spark application. Just like described in Spark documentation, we can enable mutual authentication by setting spark.authenticate to true and encryption by setting spark.authenticate.enableSaslEncryption to true in Spark configuration (which can be done either directly or by setting defaults in spark-defaults.conf). You may, but you are not required to provide the secret key explicitly. If it is missing, it will be automatically generated using secure random generator.
Communication between a driver and a master
As said before, the driver uses CQL to communicate with a master therefore that connection undergoes the same rules as any other DSE native protocol connection. If DSE requires authentication from the clients, the authentication will be required for Spark Applications. If DSE requires TLS, you will need to provide a trust store and perhaps a key store. If authorization is enabled in DSE, you will also need to setup permissions to connect, to talk to the resource manager and to submit an application.
Just as a reminder, CQL encryption can be enabled in client_encryption_options section of cassandra.yaml, while authentication and authorization are managed in authentication_options and authorization_options of dse.yaml.
Connecting to DSE Spark
In Spark applications, we choose the cluster manager type and provide connection information through a master URI string. For example, Spark Standalone is identified by the spark:// prefix, Yarn - by the yarn:// prefix and Mesos - by the mesos:// prefix. DSE Resource Manager is defined as a third-party cluster manager and is identified by the dse:// prefix.
Similarly to previous DSE versions, the user does not need to provide the master address explicitly because that master is (and was) configured automatically. In DSE prior to 5.1, when an application was submitted, the bootstrapper program opened a CQL connection to a DSE node and invoked queries to get the current IP address of the Master. Next the SparkContext acquired a direct connection to that master to perform registration. In DSE 5.1, we still obtain CQL connection but we do not connect to the master directly. All information is exchanged through that initial CQL connection. In fact, on the client side, we do not need to care where the master is or even whether there is some master at all.

Fig. 3 - High availability of the Driver to DSE Resource Manager connection
Request can be sent to any DSE node and they will be redirected to the node where Spark Master is running
DSE Resource Manager connection string
The URL has the following shape:
dse://[<host_address>[:<port>][,<host_address2>]...]?[param=value;]...
The host addresses here are just initial contact points. Only one of them is required to be alive during application submission; therefore providing more contact points can greatly increase the chance of successfully submitting the application. Remember, the addresses provided do not have anything to do with the current location of Master - they are just RPC broadcast addresses of some DSE nodes.
The optional parameters which come after the question mark can define the target datacenter, timeouts and other settings of CQL connection. Basically, those parameters are the same as those used by the Spark Cassandra Connector (defined here), just without the spark.cassandra prefix.
By default the connection string dse://? will connect to the local DSE node, the node specified in Hadoop client configuration or Spark configuration.
In general, connection options for Spark application submission are retrieved from the master URI string, falling back to Spark configuration, which in turn falls back to DSE configuration files. That is, unless you specify some setting explicitly, the connection used for registering the application will be the same as for Cassandra DataFrames and RDDs.
Working with multiple datacenters
In DSE, a distinct Spark cluster can be run in each DSE Analytic data center. When a Spark application is submitted, the target datacenter can be provided explicitly or implicitly in the master URI string:
- implicitly - by specifying addresses of nodes from that data center only
- explicitly - by specifying connection.local_dc option
In the first case, if the contact points belonged to various data centers, and connection.local_dc option was not specified, the client would not be able to decide to which data center the application should be submitted to and it would ended up with an error. Thus we can omit connection.local_dc only if the target data center is not ambiguous.
In the second case, the specified contact points may belong to any datacenters, not just Analytic ones. The Cassandra driver discovers the rest of the nodes and the load balancing policy will take care of passing control commands to the nodes in the specified data center only.
How to secure network communication step by step
We are going to show how to setup network security in DSE Analytic data center that includes password authentication and encryption. Let us assume there are two tiny analytic data centers with the following nodes (we assume those addresses are public):
DC1 - 10.0.1.1, 10.0.1.2, 10.0.1.3
DC2 - 10.0.2.1, 10.0.2.2, 10.0.2.3
Setup nodes
Given you have your DSE 5.1 installed on all nodes, we need to prepare configuration before the nodes are started up - we will cover only security related stuff here:
- Make sure that you use DseAuthenticator and DseAuthorizer - they should be set by default in your cassandra.yaml:
authenticator: com.datastax.bdp.cassandra.auth.DseAuthenticator
authorizer: com.datastax.bdp.cassandra.auth.DseAuthorizer
- Enable internal authentication - edit dse.yaml so that:
authentication_options:
enabled: true
default_scheme: internal
plain_text_without_ssl: block
transitional_mode: disabled
- Enable authorization - edit dse.yaml so that:
role_management_options:
mode: internal
authorization_options:
enabled: true
transitional_mode: disabled
- Secure Spark internode connections - edit dse.yaml so that:
spark_security_enabled: true
spark_security_encryption_enabled: true
- Secure DSE internode connections
Create a keystore and a truststore for each node and put them into /etc/dse/keys/ directory (remember to secure access to that directory). You can find out how to do that on many pages on the Internet, though you can also refer to DSE documentation here or to more recent version here. Then configure server encryption in cassandra.yaml:
server_encryption_options:
internode_encryption: all
keystore: /etc/dse/keys/.internode-keystore
keystore_password: keystore_password
truststore: /etc/dse/keys/.internode-truststore
truststore_password: truststore_password
require_client_auth: true
require_endpoint_verification: true
- Secure client connections
For client connections, it is usually enough to set up keystores unless you really want TLS-based client authentication - edit cassandra.yaml so that:
client_encryption_options:
enabled: true
optional: false
keystore: /etc/dse/keys/.keystore
keystore_password: keystore_password
require_client_auth: false
- Start the nodes
$ sudo service dse start
- The first thing you need to do after starting the nodes is to update the replication of some system keyspaces - you can find the details here - in our case:
$ cqlsh --ssl -u cassandra -p cassandra 10.0.1.1
ALTER KEYSPACE dse_leases WITH replication = {'class': 'NetworkTopologyStrategy', 'DC1':'3', 'DC2':'3'};
ALTER KEYSPACE dsefs WITH replication = {'class': 'NetworkTopologyStrategy', 'DC1':'3', 'DC2':'3'};
ALTER KEYSPACE spark_system WITH replication = {'class': 'NetworkTopologyStrategy', 'DC1':'3', 'DC2':'3'};
ALTER KEYSPACE dse_security WITH replication = {'class': 'NetworkTopologyStrategy', 'DC1':'3', 'DC2':'3'};
ALTER KEYSPACE system_auth WITH replication = {'class': 'NetworkTopologyStrategy', 'DC1':'3', 'DC2':'3'};
ALTER KEYSPACE "HiveMetaStore" WITH replication = {'class': 'NetworkTopologyStrategy', 'DC1':'3', 'DC2':'3'};
Then exit CQL shell for a moment and run repair to ensure the replication changes have propagated:
$ nodetool repair
and run CQL shell again.
- Next we will create users john, tim, anna, eva and grant them different privileges against DSE Resource Manager.
Create the users
CREATE ROLE john WITH PASSWORD = 'password' AND LOGIN = true;
CREATE ROLE tim WITH PASSWORD = 'password' AND LOGIN = true;
CREATE ROLE anna WITH PASSWORD = 'password' AND LOGIN = true;
CREATE ROLE eva WITH PASSWORD = 'password' AND LOGIN = true;
Authorize the users
CREATE ROLE rm_user;
GRANT EXECUTE ON REMOTE OBJECT DseClientTool TO rm_user;
GRANT EXECUTE ON REMOTE OBJECT DseResourceManager TO rm_user;
GRANT rm_user TO john;
GRANT rm_user TO tim;
GRANT rm_user TO anna;
GRANT rm_user TO eva;
Now, let:
- john be able to submit application to DC1,
- tim be able to submit applications to DC2,
- anna be able to submit applications to both data centers,
- eva be able to stop applications in DC1.
GRANT CREATE ON WORKPOOL 'DC1' TO john;
GRANT CREATE ON WORKPOOL 'DC2' TO tim;
GRANT CREATE ON ANY WORKPOOL TO anna;
GRANT MODIFY ON ANY SUBMISSION TO eva;
A workpool is a named chunk of computing resources available in the whole DSE cluster. In DSE 5.1, it is just a Spark Master along with Spark Workers in a single analytic data center.
Start the application
Before you start any application, it is good to provide some default properties for each application. In order to do that, open /etc/dse/spark/spark-defaults.conf and make sure to set the following:
spark.cassandra.connection.host  10.0.1.1,10.0.1.2,10.0.1.3,10.0.2.1,10.0.2.2,10.0.2.3
spark.authenticate                           true
spark.authenticate.enableSaslEncryption      true
And make sure you do not have spark.authenticate.secret set anywhere. Otherwise, all the applications will use that same secret key for mutual authentication and encryption rather than generating a new random one each time.
Note that we set spark.cassandra.connector.host to a set of as much nodes as possible - they are contact points and we need at least one of them is alive to obtain the connection. Obviously we could also specify those nodes in master URI string, like:
dse://10.0.1.1,10.0.1.2,10.0.1.3,10.0.2.1,10.0.2.2,10.0.2.3
However, as we said before, resource manager connection settings are inherited from Spark configuration so the set of contact points will be inherited as well. Since the hosts set will be constant in our examples, we don’t want to write it each time we want to change something else in master URI string. In other words, this hosts set will serve as a good default for both resource manager connections and Cassandra RDD.
- Try to start Spark Shell as john, provide explicit target data center - DC1, then try DC2
Note that you can check whether the application is running in DC1 or DC2 by going to the Spark Master UI in the browser - you should see that the application is registered with the Spark Master in DC1 but not with the Spark Master in DC2.
$ DSE_USERNAME=john DSE_PASSWORD=password dse spark --master dse://?connection.local_dc=DC1
$ DSE_USERNAME=john DSE_PASSWORD=password dse spark --master dse://?connection.local_dc=DC2
- Try the same as user tim, anna and eve
Note that the successful tries are the ones which are permitted due to the permissions that were granted before. You may also try to run Spark Shell as say anna but without providing target data center explicitly (that is, just remove master URI string from the command). Spark Shell will not start because target data center will be ambiguous.
- Try to remove the application using CQL shell
Firstly run Spark Shell as john and get the application identifier:
$ DSE_USERNAME=john DSE_PASSWORD=password dse spark --master dse://?connection.local_dc=DC1
scala> sc.applicationId
In a second console, try to remove that application by issuing a CQL command firstly as tim and then as eva - tim has no permission to do that, while eva has (remember to connect to one of the nodes of DC1 with CQL Shell):
$ cqlsh --ssl -u tim -p password 10.0.1.1 -e "CALL DseResourceManager.unregisterApplication ('<app_id>')"
$ cqlsh --ssl -u eva -p password 10.0.1.1 -e "CALL DseResourceManager.unregisterApplication ('<app_id>')"
Note that since the application was started by john, tim does not have a permission to manage it, thus the first command fails. However, eva has permission to manage all apps in all data centers so the second command succeeds.
Spark Master and Worker UIs
You will also notice that Spark Master and Worker UI require password authentication and perhaps the browser will complain with untrusted certificate. This is because since DSE 5.1 UI authentication is automatically enabled in both the Spark Master and Worker UI whenever it is enabled in DSE. Similarly, encryption (HTTPS) is enabled in Spark Master and Worker UI whenever client encryption is enabled in DSE. However, Spark Master and Worker UI have no authorization support yet, therefore if someone is able to login, they will have unlimited permissions in the UI.
There is also one more change with regard to Spark Master UI - you do not need to enter Spark Master address in the browser to access the UI. It is enough to enter the address of any node from the data center with the Spark Master. DSE will automatically redirect the browser to the right address.
Refer to DSE documentation to get more detailed information about DSE Resource Manager. See part 2 of this series: DSE 5.1 Resource Manager Part 2 – Process Security and stay tuned for more posts related to DSE Resource Manager, including Spark applications high availability troubleshooting.
OSS Spark Standalone Deployment
Security in Spark Standalone deployment
What we improved
Internal communication between a master and workers
Internal communication between a driver and its executors
Communication between a driver and a master
Connecting to DSE Spark
DSE Resource Manager connection string
Working with multiple datacenters
How to secure network communication step by step
Setup nodes
Start the application
Spark Master and Worker UIs
More Technology
View All
How to Build a Crystal Image Search App with Vector Search

Knowledge Graphs for RAG without a GraphDB