Tracking NFT Transfers using Astra DB and Web3.js

Alex LeventerHead of GenAI Ecosystem
This is the first post in our brand new Astra DB Crypto Blog Series - everything you need to know about Web3. For the debut, we'll introduce you to NFTs and walk you through how you can load them into DataStax Astra DB — a multi-cloud database-as-service (DBaaS) built on Apache Cassandra.You'll learn exactly what NFTs are, how to do NFT transfers, the types of NFT smart contracts, and how to use the Astra DB data loader to load every NFT ever minted into Astra DB. WIth this post, navigating NFTs and Web3 will be easier than ever. Let's get started.
NFT Basics
NFT stands for Non-Fungible Token. In short, NFTs are digital assets that represent unique objects, which can be anything from art pieces to music to exclusive event tickets and more. NFTs have been around since 2014, with the first NFT having been minted on the Namecoin blockchain in May of that year. Experimentation with the technology would go on for a number of years, with a large number of platforms being developed on the Bitcoin and Ethereum blockchains.
The core advantage demonstrated by NFTs is the NFT smart contract that is built into each transaction: essentially verifying you as the sole owner of a unique token (that token being your NFT, regardless of what content is stored therein). NFTs as digital assets slowly started hitting their peak in 2020, with crypto projects like Cryptopunks and blockchain-based games like Crypto Kitties helping the concept gain mainstream popularity. 2021 would see NFTs and blockchain technology explode alongside NFT and crypto projects like Bored Ape Yacht Club and Axie Infinity gaining particular notoriety.
Core Applications of NFTs (and NFT Transfers)
The main application for NFTs at the current moment is to represent digital ownership of a digital asset: whether that asset be a piece of artwork or a lot of digital real estate. Broadly, NFTs and NFT smart contracts could be used in order to verify ownership of real-world assets as well ,such as cars and real estate— thanks to blockchain technology and minting. In the world of blockchain technologies, NFTs are a promising extension of the decentralization efforts of Web3 and signal a new type of internet transaction.
Generally, NFTs are purchased and sold using cryptocurrencies like Bitcoin or Ether via auction house websites like OpenSea or Rarible. Users bid on these unique tokens with the corresponding cryptocurrency in order to purchase the sole ownership of said token. Each NFT is created through a process called minting— a process of converting digital data into crypto assets that are stored on a blockchain— which makes each NFT unique and irreplaceable. NFTs are stored on multiple blockchain and, although most are on the Ethereum blockchain, functionality is shared across these various technologies through following two NFT standards (ERC-721 and ERC-1155).
Let's dig a little further into that last point.
What is an NFT Smart Contract?
An NFT Smart Contract is a mechanism used to implement a sale agreement between the NFT owner and the buyer. These smart contracts are self-executing, meaning that they can automatically check and verify that the contract terms have been met accordingly and then execute the terms of the contract without the need for an intermediary or any third party. The programming of a smart contract exists within the blockchain, which enables the network to store all of the information needed for transferring NFTs. This way, the verification process and transferring of assets can happen without a hitch. Within the form of NFT smart contracts, there are a couple of different standards through which these contracts must be formed.
The Two Different NFT Smart Contract Standards
Think of these standards as a consistent set of APIs for developers to interact with NFTs. There has to be a guiding principle behind every project and these NFT smart contract standards are no exception. These guidelines and set of APIs allow developers to interact with NFTs, NFT smart contracts, and NFT transfers with expediency and ease, making the process of creating smart contracts smoother and more efficient. The efficiency of having these smart contract standards, as well as the smart contracts themselves, allows the entire process of buying NFTs (from minting to purchasing) to run smoother.
The two standards are:
- ERC-721 (Single Token Standard)
- A single deployed contract to manage one token
- Example: Bored Ape Yacht Club
- Events: Transfer, Approval, ApprovalForAll
- Functions: balanceOf, ownerOf, safeTransferFrom, transferFrom, approve, setApprovalForAll, getApproved, isApprovedForAll, tokenURI
- ERC-1155 (Multiple Token Standard)
- A single deployed contract to manage one or many tokens
- Example: Billionaire NFT Club
- Events: TransferSingle, TransferBatch, ApprovalForAll, URI
- Functions: safeTransferFrom, safeBatchTransferFrom, balanceOf, balanceOfBatch, setApprovalForAll, isApprovedForAll, uri
Pulling NFT Transfers
Now let's go through the steps to pull NFT transfers and grab the metadata that you'll store in Astra DB later on.
1. Listen for new blocks to be mined, get the block number for the newly minted block.
web3.eth.subscribe("newBlockHeaders", (err, result) => {
const { number } = result;
});
2. Get the block details using the block number.
const block = await web3.eth.getBlock(blockNumber);
3. Grab the transaction receipts by iterating through the block transactions.
for (
let transactionNo = 0;
transactionNo < block.transactions.length;
transactionNo++
) {
const receipt = web3.eth.getTransactionReceipt(transaction);
}
4. The first log of each transaction recipient will contain an event signature. NFTs can be transferred in three ways: TransferSingle, TransferBatch, Transfer. If the decoded log matches one of the three transfer event signatures, you've detected an NFT transfer.
You can use a tool like 4Byte.directory to decode signatures.
const ERC1155_TRANSFER_SINGLE_TOPIC =
"0xc3d58168c5ae7397731d063d5bbf3d657854427343f4c083240f7aacaa2d0f62";
for (let logNo = 0; logNo < transactionReceipt.logs.length; logNo++) {
const firstTopic = transactionReceipt.logs[logNo].topics[0];
if (firstTopic === ERC1155_TRANSFER_SINGLE_TOPIC) {
console.log('NFT Transfer Detected');
}
}
5. Once you've detected a NFT transfer, you can pull additional metadata on the NFT, using the uri function: tokenUri (for 721s) or uri (for 1155s) function.
const abi: AbiItem = isErc1155
? {
name: "uri(uint256)",
type: "function",
inputs: [
{
type: "uint256",
name: "id",
},
],
}
: {
name: "tokenURI(uint256)",
type: "function",
inputs: [
{
type: "uint256",
name: "_tokenId",
},
],
};
const res = await web3.eth.call({
to: contractAddress,
data: web3.eth.abi.encodeFunctionCall(abi, [tokenId.toString()]),
});
uri = web3.eth.abi.decodeParameters(["string"], res);
6. IPFS (the Interplanetary File System) is commonly used to store NFT metadata. You can convert IPFS links to JSON using the ipfs.io gateway.
const res = await axios.get(
`https://gateway.ipfs.io/ipfs/${url?.replace("ipfs://", "")}`
);
return res?.data;
7. You're done! Now you're ready to store the NFT metadata with the Astra DB Document API.
const astraClient = await createClient({
astraDatabaseId: process.env.ASTRA_DB_ID,
astraDatabaseRegion: process.env.ASTRA_DB_REGION,
applicationToken: process.env.ASTRA_DB_APPLICATION_TOKEN,
});
const nftsCollection = astraClient.namespace("app").collection("eth");
const nft = await nftsCollection.create(contractAddress, {
tokenId,
metadata
});
You can create a free Astra account or simply clone the NFT dataset to your Astra account with the steps below.
Create a Database in Astra DB
- First, head over to the dashboard and hit the button “Create Database”.

Figure 1: Screenshot of Astra DB dashboard option to create a database.
1. Enter the database name and keyspace name, then select a provider and region.
Database Name: NFT
Keyspace: eth
Provider: Google Cloud
Region: us-east1
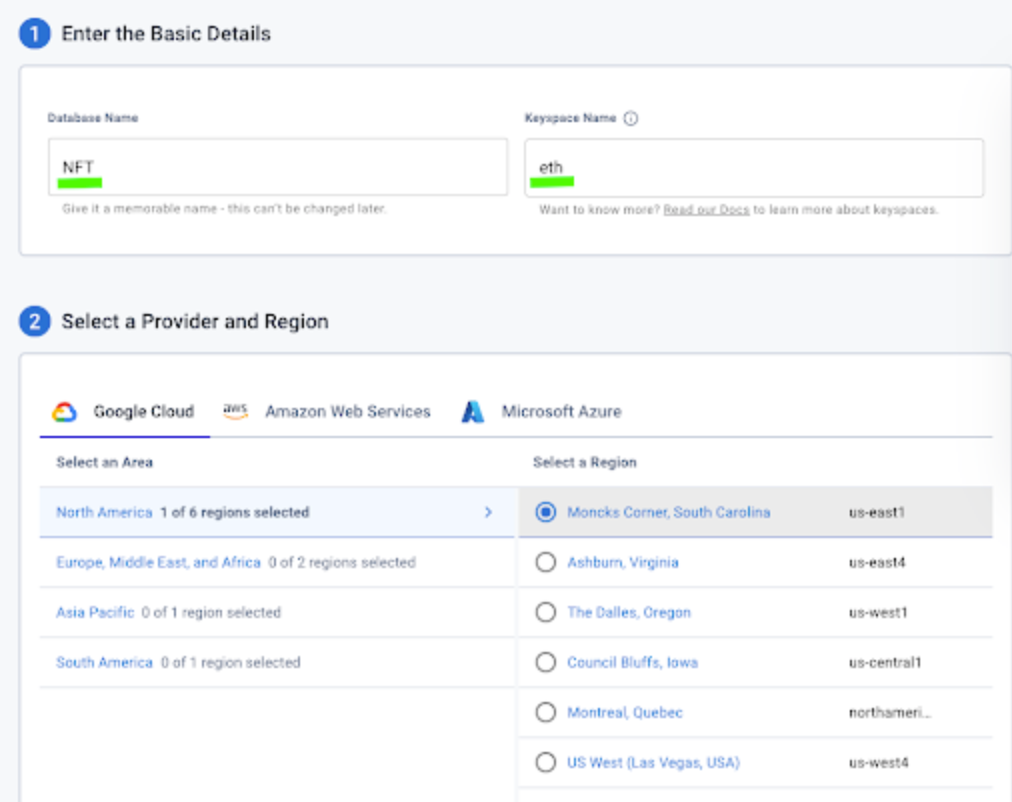
Figure 2: Screenshot of new database information.
2. Next, navigate to the Data Loader and load the sample dataset, which in this case is Ethereum NFTs.
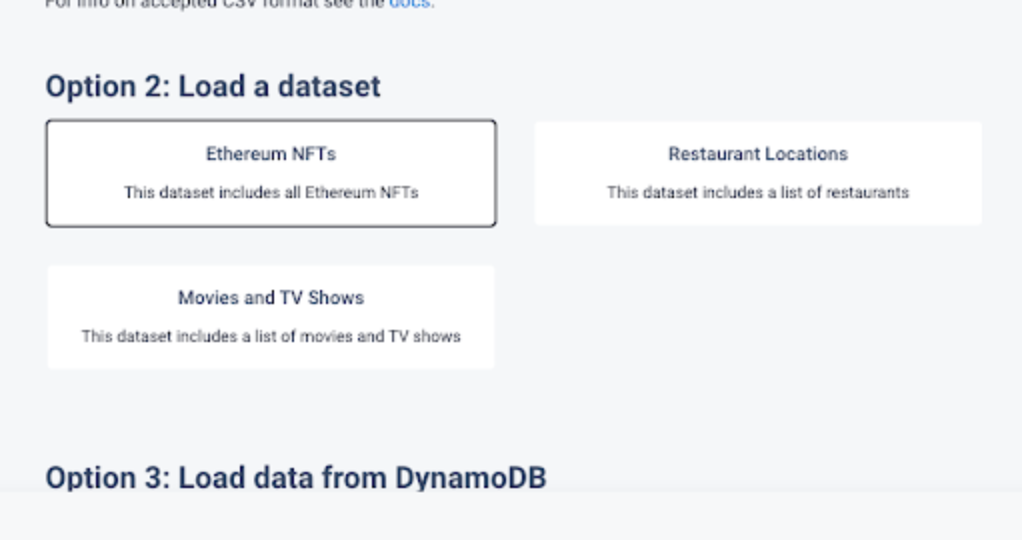
Figure 3: Screenshot of options to load a dataset.
3. Select the partition key and clustering column, and finish loading the table. Use the following information:
Partition Key: contact_address
Clustering Column: token_id
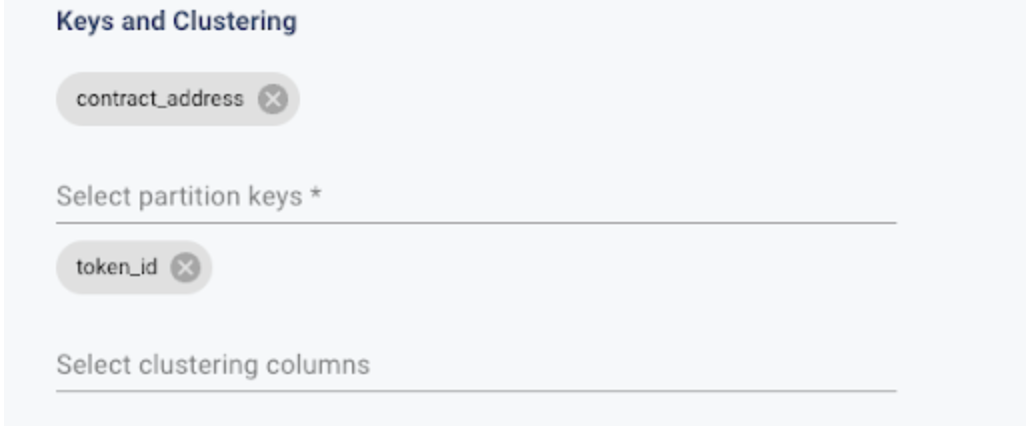
Figure 4: Screenshot of key and clustering fields.
4. Navigate to the CQL Console and run queries against the Ethereum NFT dataset you loaded earlier.
![]()
Figure 5: Screenshot of CQL Console option.
Now that's all locked and loaded, we can move onto searching for an NFT in your database.
Search for an Individual NFT
Here's what we want to see when searching for an NFT.
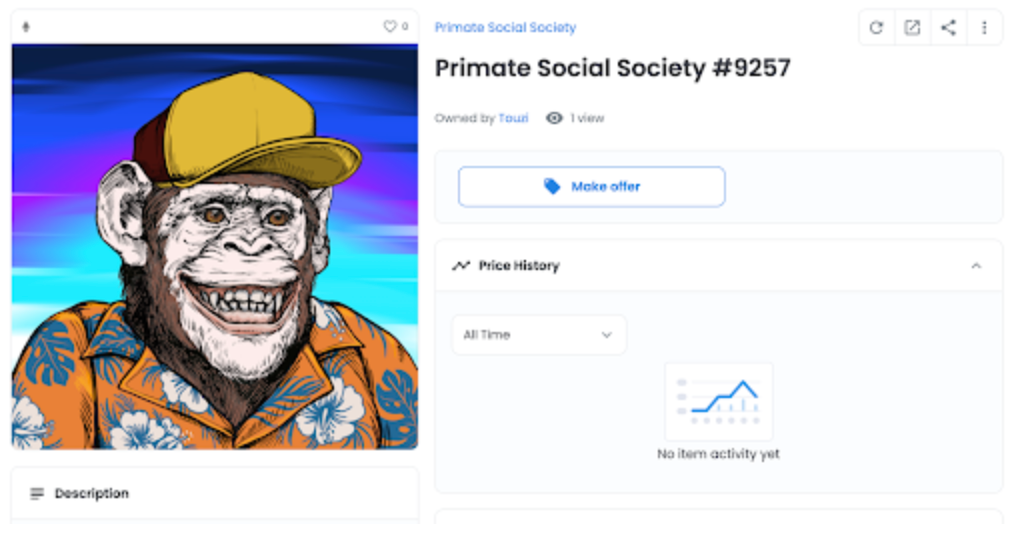
Figure 6: Screenshot of an example NFT (Source).
SELECT * FROM eth.nfts WHERE contract_address='0x36D7b711390D34e8fe26ad8f2bB14E7C8f0c56e9' AND token_id='4665';
Your output should look like this:
contract_address | 0x36D7b711390D34e8fe26ad8f2bB14E7C8f0c56e9
token_id | 699
block_number | 14843353
metadata | {"name":"Okay Duck Yacht Club #699","description":"Ducks are quackin'. Join the Yacht Club and be Okay.","image":"ipfs://QmUmnn8CrWyukriFL2ZMA4jVGVTAYMgwfGXxWVvBEGQ3nu/699.png","dna":"834ac0d3ee85574099881370a3cc19dec924d8c5","edition":699,"attributes":[{"trait_type":"Background","value":"Purple"},{"trait_type":"Body","value":"Cream"},{"trait_type":"Eyes","value":"Not Okay"},{"trait_type":"Eyewear","value":"Eyepatch"},{"trait_type":"Beak","value":"Cigar"},{"trait_type":"Clothes","value":"Leather Jacket"},{"trait_type":"Hat","value":"Sailor Hat"}]}
name | Okay Duck Yacht Club
owner_of | 0x6f04aa40c062a35d5149b85d62db94e29025bf17
symbol | ODYC
token_standard | ERC721
token_uri | ipfs://QmUapkBYTtVpahj7gmZiAGDeSmBy5hG4HkUW1yiye1eQNC/699.json
Search for all NFTs in a block using storage attached indexes
SELECT * FROM eth.nfts WHERE block_number=14843498 ALLOW FILTERING;
This will return all the NFTs that were transacted during the block 14843498.
Search for all NFTs with name = ‘Okay Duck Yacht Club'
SELECT * FROM eth.nfts WHERE name='Okay Duck Yacht Club' ALLOW FILTERING;
This returns 19 results in the dataset, as shown below.
...rows 1-17
contract_address | 0x36D7b711390D34e8fe26ad8f2bB14E7C8f0c56e9
token_id | 730
block_number | 14843493
metadata | {"name":"Okay Duck Yacht Club #730","description":"Ducks are quackin'. Join the Yacht Club and be Okay.","image":"ipfs://QmUmnn8CrWyukriFL2ZMA4jVGVTAYMgwfGXxWVvBEGQ3nu/730.png","dna":"e1e3ec3fdf469d10e31ab6f8192fa770794b6e3b","edition":730,"attributes":[{"trait_type":"Background","value":"Lavender"},{"trait_type":"Body","value":"Bloody"},{"trait_type":"Eyes","value":"Doped"},{"trait_type":"Eyewear","value":"None"},{"trait_type":"Beak","value":"Quackin'"},{"trait_type":"Clothes","value":"Skeleton Shirt"},{"trait_type":"Hat","value":"Halo"}]}
name | Okay Duck Yacht Club
owner_of | 0x0000000000000000000000005d987f2f1689ecd4c21f1e73e2f12762570fded5
symbol | ODYC
token_standard | ERC721
token_uri | ipfs://QmUapkBYTtVpahj7gmZiAGDeSmBy5hG4HkUW1yiye1eQNC/730.json
@ Row 19
contract_address | 0x36D7b711390D34e8fe26ad8f2bB14E7C8f0c56e9
token_id | 987
block_number | 14843324
metadata | {"name":"Okay Duck Yacht Club #987","description":"Ducks are quackin'. Join the Yacht Club and be Okay.","image":"ipfs://QmUmnn8CrWyukriFL2ZMA4jVGVTAYMgwfGXxWVvBEGQ3nu/987.png","dna":"68813b24a7c642676b3e63dd0b05c22947f0335e","edition":987,"attributes":[{"trait_type":"Background","value":"Light Blue"},{"trait_type":"Body","value":"Cream"},{"trait_type":"Eyes","value":"Not Okay"},{"trait_type":"Eyewear","value":"Heart Shaped Glasses "},{"trait_type":"Beak","value":"Quackin'"},{"trait_type":"Clothes","value":"Black Sleeveless Shirt"},{"trait_type":"Hat","value":"Halo"}]}
name | Okay Duck Yacht Club
owner_of | 0x0000000000000000000000001ebc712c4fe85d8bf73be303028311d600cb8ec4
symbol | ODYC
token_standard | ERC721
token_uri | ipfs://QmUapkBYTtVpahj7gmZiAGDeSmBy5hG4HkUW1yiye1eQNC/987.json
And there you have it! You've just loaded an entire dataset of NFTs into your Astra DB in just a few steps.
Get Started Managing Your NFTs Now, with Astra DB
Note that this is just the tip of the iceberg of how you can wield Astra DB to easily manage NFTs, so stay tuned for the next posts in this Astra DB Crypto Blog Series to learn much more. Check out our next DataStax crypto series post, Pulling Real-Time Ethereum Transactions with Web3.js, where we cover RPC Node basics, how to connect to a RPC node, and viewing real-time transactions.In the meantime, if you have any questions or need help with any of the instructions above, ping us at hello@datastax.com.
Follow DataStax on Medium for exclusive posts on all things open source, including Pulsar, Cassandra, streaming, Kubernetes, and more. To join a buzzing community of developers from around the world and stay in the data loop, follow DataStaxDevs on Twitter and LinkedIn.