Building Scalable Streaming Applications with DataStax Astra Streaming

Jeff DaviesData Architect

Astra Streaming enables developers to build streaming applications on top of an elastically scalable, multi-cloud messaging and event streaming platform, powered by Apache Pulsar. DataStax Astra Streaming is currently in beta, and we’ll be releasing a full demo soon. In the meantime, this article will give you a short demo to provide a great starting point for familiarizing yourself with this powerful new streaming service.
Here’s what you will learn:
- How to create an Astra Streaming tenant, complete with namespaces, topics, and sinks
- How to produce messages for a topic that makes use of serialized Java POJOs
- How to store topic messages in a DataStax Astra database
To illustrate, we’ll use Astra Streaming to replicate (albeit crudely) the streaming object tracking information provided by the Federal Aviation Authority (FAA) to each airport. This stream reports the location of every piece of equipment at the airport (planes, fuel trucks, aircraft tow tractors, baggage carts, etc).
Let’s start building!
With Astra Streaming, not only can you feed information into the streaming “pipe”, but also store those events into various destinations (aka "sinks"), like a Kafka topic, Elastic Search, Snowflake and more. In this example, we will store the events in an AstraDB database for later analysis. This allows us to view our object tracking information in two ways:
- Where is everything located right now?
- Where has a specific object been located historically? This is useful for tracking the paths of the object over time.
To build our streaming pipeline for tracking objects in real-time and historically, we’ll have to build the following:
- An Astra Streaming tenant with a single topic
object_location - A Java producer that will publish events to the
object_locationtopic - An AstraDB database with two tables that get data from the
object_locationtopic
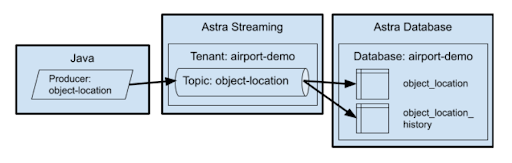
Figure 1: All the moving parts we’ll need to build for this demo.
Continuing with our object tracking example, a single topic will feed data into two different tables: the object_location table and object_location_history table.
The object_location table records only the most recent known location for an object, and the object_location_history records all locations that an object has been located at any given time. The location history data is useful for different types of analyses, like analyzing the flow of different objects through the airport terminal.
In addition to object tracking, this approach can be used for any use case that requires the ability to see both real-time streaming data and historical data. For example, tracking stock prices where one table holds the current stock price, while another table holds the historical stock prices.
Create the database
The first step is to create the database. This is a very simple database with only two tables, which we’ll create in a keyspace called airport to keep things simple. The tables in the airport keyspace are object_location which tracks where every object is at the moment (more accurately, the last known location), and object_location_history which tracks the object's location over time, with the most recent update listed first.
If you are following along with your own AstraDB instance, simply create a database with the keyspace airport and then run the database/create.cql file to create your tables. Pick a cloud provider and a region. Remember these choices as you will want to create your streaming instance in the same provider and region later.
Create a custom role
It is possible to create an access token that grants you access to all of your databases, but I highly recommend creating database-specific tokens based on custom roles. On more than one occasion, I’ve accidentally leaked security tokens into GitHub (errors that I corrected within minutes). The only thing that’s saved my bacon is the fact that the token was restricted to a single database. If you’re not familiar with the process for creating a token, I’ll show you how later in this blog.
After creating the database, click on the down arrow next to your organization name, as shown in the red square in the following image.
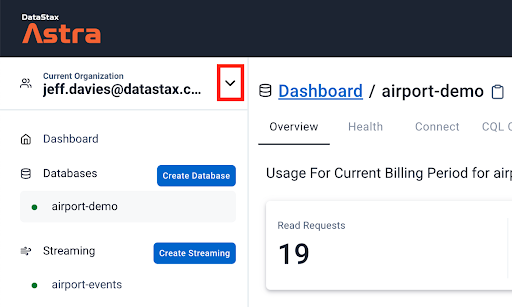
Figure 2. Accessing your organization settings.
This will bring up a menu. Click on the Organization Settings menu item. Once the page loads, click on the Role Management menu item on the left side of the page and press the Add Custom Role button.
Give your role a meaningful name. As you can see in the following image, I named my custom role airport-demo. Then start selecting the permissions for your role. As this role will be specific to a database built for demo purposes, I'm being liberal with my permissions. Set your permissions to suit your needs and scroll down to access the rest of the page.
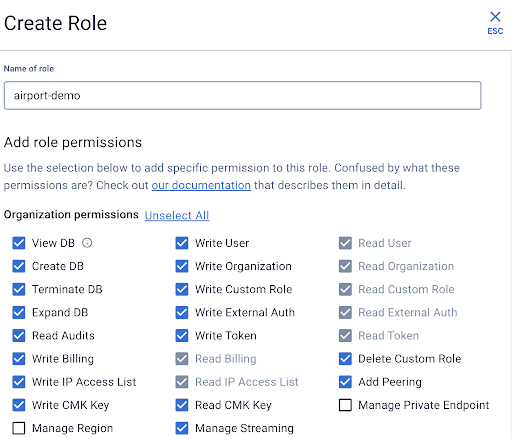
Figure 3. Screenshot showing how to define the permissions for your custom role.
Select the keyspace permission and table permissions as appropriate. I like to enable all of the APIs for my databases, so I usually select them all. The most important step occurs at the very bottom where you select the single database for which this role applies.
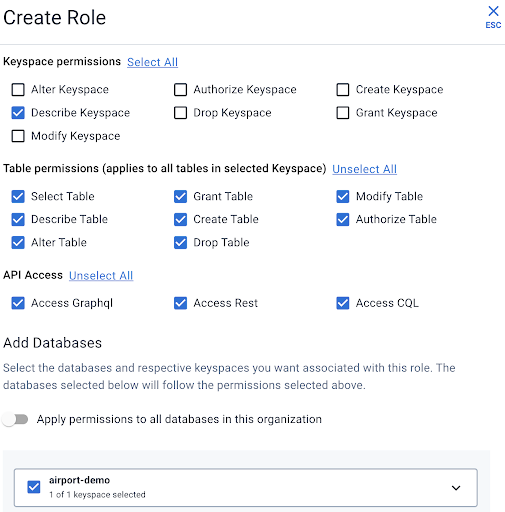
Figure 4. Screenshot showing how to finish the custom role definition.
When you are satisfied with your role configuration press the Create Role button.
Generating your database token
Now you can create a security token specific to your customer role and database. Select the Token Management menu item, followed by the custom role you created earlier. Click the Generate Token button.
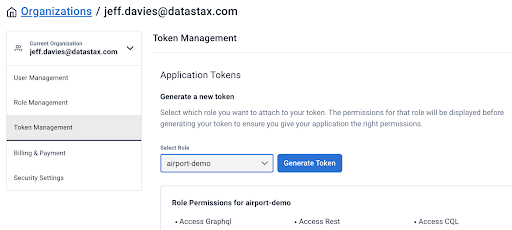
Figure 5. Generating a Token.
You’ll need to be cautious here as the dialog box that pops up will never be displayed again. You’ll need this token information in your source code to connect to the database from Astra Streaming. Press the Download Token Details button to download a CSV file with your token.
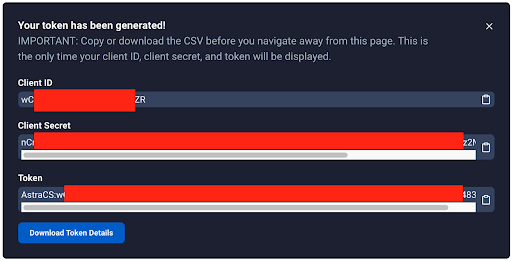
Figure 6: You won't see this again. Take this opportunity to download It.
Create the Astra Streaming components
Now we’re going to shift gears and create the Astra Streaming components. Here we will create a tenant, namespace, and a topic.
Create the Astra Streaming tenant
An Astra Streaming tenant is the top-level object for streaming. Think of a tenant as akin to an application or a database. Create a new streaming tenant in the Astra DB web console and name it airport-events. When the tenant is fully created and running, you will see a small green dot to the left of its name, and the dashboard for the tenant will show up in your browser, as shown in Figure 7.
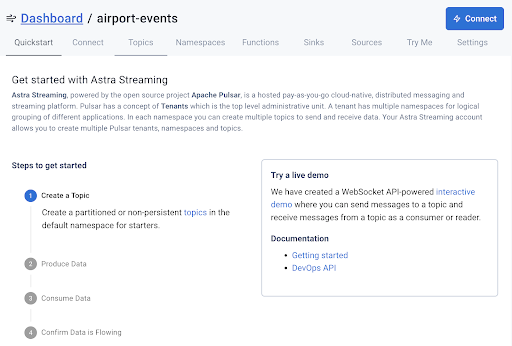
Figure 7. The airport-events tenant dashboard.
Create the Astra Streaming namespace
This step is optional because there is a default namespace created for you when you create a tenant. However, I like to keep things organized and isolated so I strongly recommend you create a namespace for the airport-events. Click on the Namespaces tab.
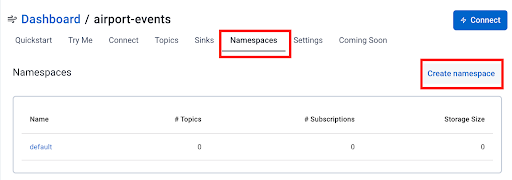
Figure 8. Creating a namespace in Astra Streaming.
Set the namespace to airport and click on the Create namespace button. It’s just that easy!
Create the Astra Streaming Topic
Our next step is to create the topic for our object location events. Click on the Topics tab in the dashboard. By default, you will see both the new airport namespace and the default namespace listed in the dashboard. Click the Add Topic button in the airport namespace to create the new topic.
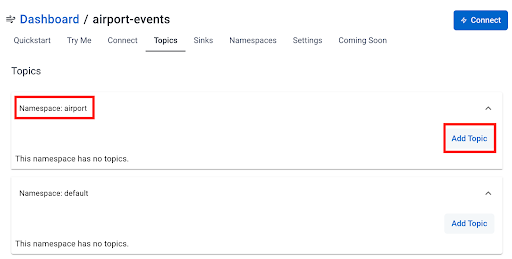
Figure 9. Creating a topic in the airport namespace.
You only need to specify the name of the topic, object-location, as shown in the next image.
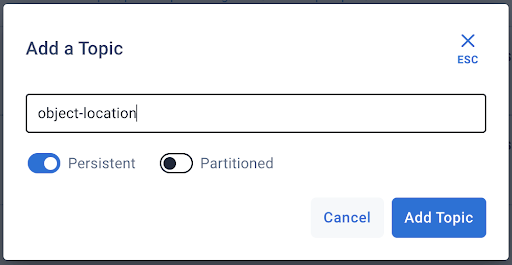
Figure 10. Creating the object-location topic in the airport namespace.
Press the Add Topic button.
At this point, we have a topic on which we can publish events – but those events don’t go anywhere just yet. We will next create two “sinks’’ that will consume the events and store them in a database. A “sink” in streaming terms is a destination for the messages. For this article, we will use the Astra DB to store our events.
Create the Astra DB sinks
The mechanism Astra Streaming uses to store events to a database is a sink. We will need to create two sinks, one for each of our tables.
-
Create the object-location sink
Our first sink will store the event on the object_location table. This table is different from the object_location_history table – in that it does not have the ts (timestamp) field. Click on the Sinks tab and then press the Create Sink button.
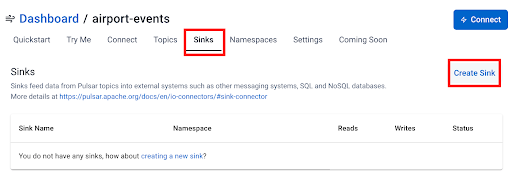
Figure 11. Creating the sink for the object_location table in our Astra DB.
In Step 1 of the wizard, select the fields as shown in the following image:
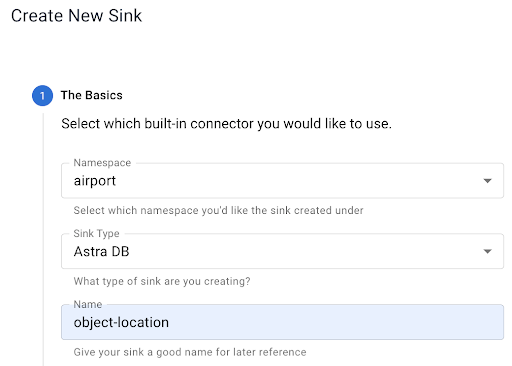
Figure 12. Step 1 – Create the object-location sink.
Be sure to select the object-location topic in Step 1 of the wizard, as shown next:
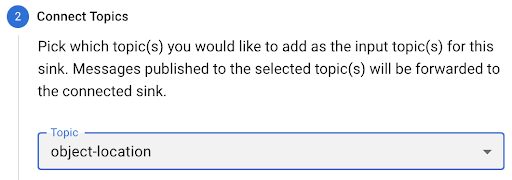
Figure 13. Step 2 – Select the topic.
Next, provide the connectivity information for your database. All of the information is important, but the database token is probably the most critical piece here. After pasting your token in, press the TAB button to exit the token field. This will prompt the Astra website to inspect your database and table and generate the field mappings, as you will see next:
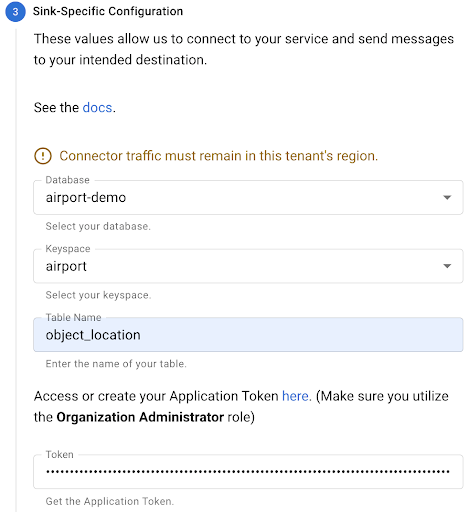
Figure 14. Step 3 – Specify the database you want to use.
The field mapping is done automatically for you. Notice that the automatic mapping only concerns itself with the fields in the table you have specified. There is no schema for the overall topic yet because we haven’t sent any messages over to the topic (we will get into that in a bit).
I have yet to find a condition where the automatic mapping is incorrect, but it never hurts to check twice! Also, you can now expand the area for the object_location schema and view the details there, as shown in the following image:
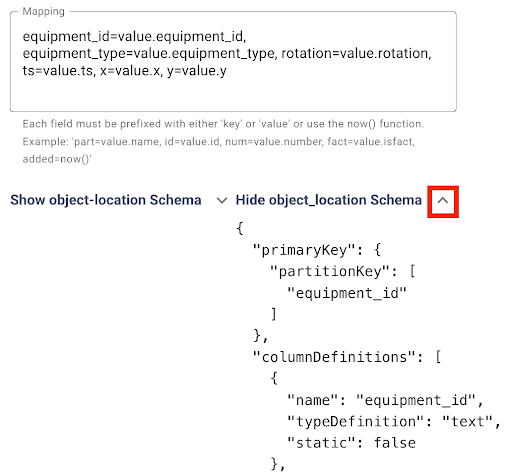
Figure 15. The field mapping Is generated automatically for you.
Press the Create button to create the sink.
-
Create the objloc-history sink
Next, we will create our second sink that will capture information into the object_location_history table. You will essentially perform the same steps you did for the first sink – but with some key differences:
- Sink Name:
objloc-history(names are limited to 18 characters) - Topic: Pick the
object-locationtopic again. It will feed both of our tables! - Table Name:
object_location_history
This time when you enter the database token and TAB out of the field, the mapping will appear a little differently, as shown below.
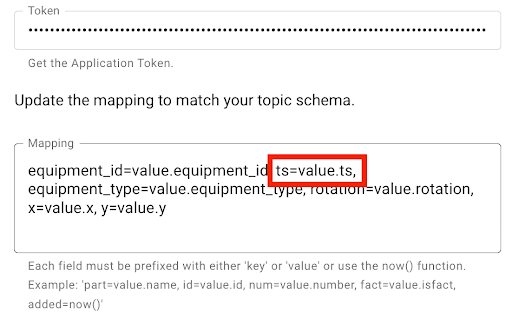
Figure 16. Notice the field mapping is slightly different for this sink.
This is because the ts or timestamp field (a Java long data type) is included in the mapping. Press the Create button to create this sink.
Create a Java producer
Things that generate messages on a topic are called “producers” in Apache Pulsar (and by extension in Astra Streaming). We need to create a producer that will send messages to the object-location topic. We don’t want to send simple string messages! We want to send an object that can be stored in database tables.
You can look at the Java code in the folder for this demo on GitHub, where you will see several files. The main entry point is the App.java file. It’s a pretty simple file that just instantiates a Flight object and causes the Flights run() method to be invoked every second. The interesting work is in the Flight class.
The Flight class produces messages on the object-location topic each time the run() method is invoked. The constructor of the Flight class takes care of creating the PulsarClient connection and then the Pulsar topic producer.
The most important thing to note here is the use of a JSON Schema based on the ObjectLocation class. This tells Pulsar the exact schema of the object being sent. Pulsar will expect the message to match the specified JSON Schema. If the message doesn't match the schema exactly, you will receive an error message.
public Flight(String flightID, String aircraftType) {try {// Initialize our location
Date now = new Date();
objLoc = new ObjectLocation(flightID, aircraftType, 0.0, 0.0,
now.getTime());
// Create client object
client = PulsarClient.builder()
.serviceUrl(BROKER_SERVICE_URL)
.authentication(
AuthenticationFactory.token(Credentials.token)
)
.build();
// Create producer on a topic
producer = client.newProducer(JSONSchema.of(ObjectLocation.class))
.topic("persistent://" + STREAM_NAME + "/" + NAMESPACE + "/" + TOPIC).create();
} catch(Exception ex) {System.out.println(ex.getMessage());
}
}
No messages are sent to the topic until the run() method is invoked. Here is the run() method implementation:
public void run() {// Send a message to the topic
try {producer.send(objLoc);
System.out.println(objLoc.toString());
Date now = new Date();
updatePosition(objLoc);
objLoc.setTs(now.getTime());
} catch(PulsarClientException pcex) {pcex.printStackTrace();
}
}
The producer.send(objLoc) takes a native Java POJO that watches the schema expected and sends it over the topic. Note that you don’t have to serialize your object. The Pulsar libraries are smart enough to take care of that for you! Also, the very first time you run this code (which we will do next), Astra Streaming will record the schema for the message type. You can view that schema by navigating to your topic and clicking on the Schema tab, as shown next:
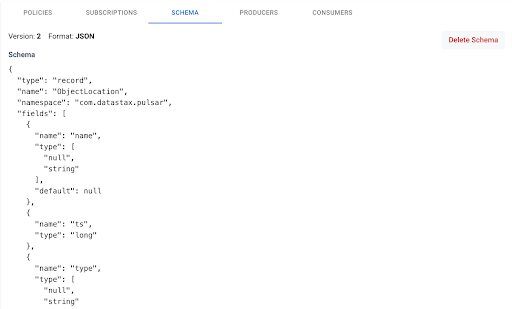
Figure 17. Viewing a topic schema.
Seeing it in action
If you load the project up in an editor like VS Code, you can run the App class to see the application in action. Before you do, you need to create your Credentials.java class. This file should be in the same folder as the App.java file. Your Credentials.java file should look like the following:
package com.datastax.pulsar;
public class Credentials {public static String token = "YOUR TOKEN INFO HERE";
}
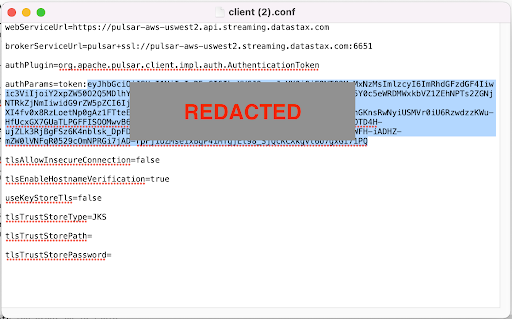
Where do you get your token info? Well, go to the dashboard for your airport-events streaming tenant and click on the Connect tab. Locate and press the Download client.conf button.
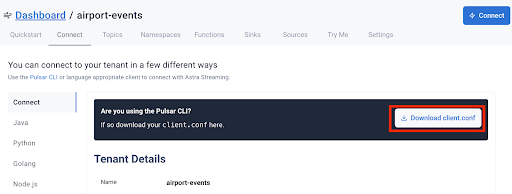
Figure 18. Downloading your client configuration for Astra Streaming
Open the client.conf button that you downloaded and copy just the token value (not including the token: prefix!). Paste that value into the token variable in your Credentials.java file and you're ready to go!
Now you can run the App.java class and see output similar to the following:
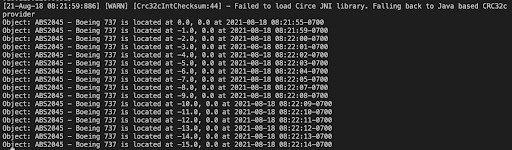
Figure 19: Events generated by the producer.
From the output above, we can see that the producer is generating events/messages on our topic. Now let’s check our database tables to see the recorded data. I’m going to use the CQLShell window on the Astra website to keep things simple. Let’s start by looking at the object_location table.
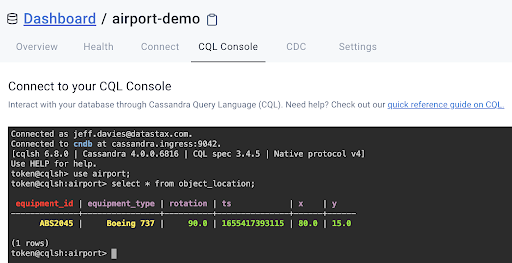
Figure 20. There should be a single record in your object_location table.
Remember, the purpose of this table is to record the last known location of an object, a Boeing 737 in this case. Your X and Y coordinates will vary depending on when you stopped the application from creating messages.
Now let’s take a look at our object_location_history table:
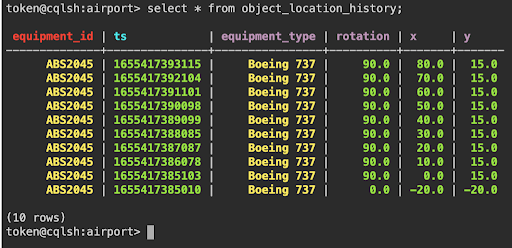
Figure 21. Our object_location_history table’s data.
Try it yourself!
As you can see, making real use of Astra Streaming is easy to do. Regardless of several screenshots and the level of detail provided here, building this application involves just a few simple steps:
- Create a Database
- Create the
object_locationtable - Create the
object_loction_historytable. - Create the custom role (optional)
- Generate a token for the database
- Create a Streaming Tenant
- Create the
airportnamespace - TwitterCreate the
object_locationtopic - Create the
object_locationsink - Create the
objLoc-historysink
- Create a Java Topic Producer
That’s all there is to it! Now you have a recipe for sending and receiving event objects via Astra Streaming and storing them in an Astra DB.
There’s never been a better time to start building streaming applications, and now with Astra Streaming, it’s never been easier. Try this code yourself by creating your free Astra account with no credit card required. Your Astra account will work for both Astra DB and Astra Streaming. When you sign up, you’ll get $25.00 worth of free credits each month in perpetuity! That’s enough to cover 30 million read requests, four million write requests, and 40GB of data storage.
Pro Tip - Use Public Visibility
One quick tip that tripped me up while writing this: out of habit I made my class attributes private instead of public. As a result, I was getting error messages about providing NULLs for the primary keys. Why? Because when the code was introspecting the serialized objects being passed in, private variables are not serialized! To see an example of how your objects should be defined, take a look at the ObjectLocation.java file. Once I changed these member variables to be public, everything worked fine.
Resources
Let's start building!
Create the database
Create a custom role
Generating your database token
Create the Astra Streaming components
Create the Astra Streaming tenant
Create the Astra Streaming namespace
Create the Astra Streaming Topic
Create the Astra DB sinks
Create the object-location sink
Create the objloc-history sink
Create a Java producer
Seeing it in action
Try it yourself!
Pro Tip - Use Public Visibility
Resources
More Company
View All
The Top 5 DataStax Stories from 2023