How to Connect Temporal.io to Astra DB with Kubernetes

Melissa HerreraLead Solutions Engineer

Ranjan MelantaData Architect
Temporal.io is an open-source microservice orchestration platform that provides you with a plug-and-play persistence layer that lets you choose and configure your Temporal Server with your preferred backend.
In Part 1 of this blog series on using Temporal.io with DataStax Astra DB, we showed you how Apache Cassandra® is the ideal choice as a reliable and highly available backend database for apps that need scale. In Part 2, we walked you through connecting Temporal with Astra DB using CQL-proxy—a sidecar designed to forward your app's CQL traffic to an appropriate database service.
In this third and final post of the series, we’ll show you how to deploy Temporal to Astra DB with Kubernetes (K8s). Deploying a K8s cluster is an easy way to test the system and develop Temporal applications. To make things even simpler, we’ll be deploying Temporal to the K8s cluster using Helm Charts, which is great for quick deployment, accessible application configuration, and making sure all your components are running properly—like the app and your Astra DB backend.
That said, let’s get started!
Step 1: Astra prerequisites
Before connecting to Temporal, you need to first create an Astra database instance and gather all your credentials. If you haven’t already, register for a free Astra DB account that will give you a generous 80 GB each month to play with. Next, follow these instructions to spin up your database:
a) When asked for the keyspace name, name it temporal.
b) Once your database is created, navigate back to your database dashboard and click Add Keyspace.
c) Name this second keyspace temporal_visibility.
d) The status of your database will temporarily go to Maintenance, but after a couple seconds you can refresh your screen and the status should go back to Active.
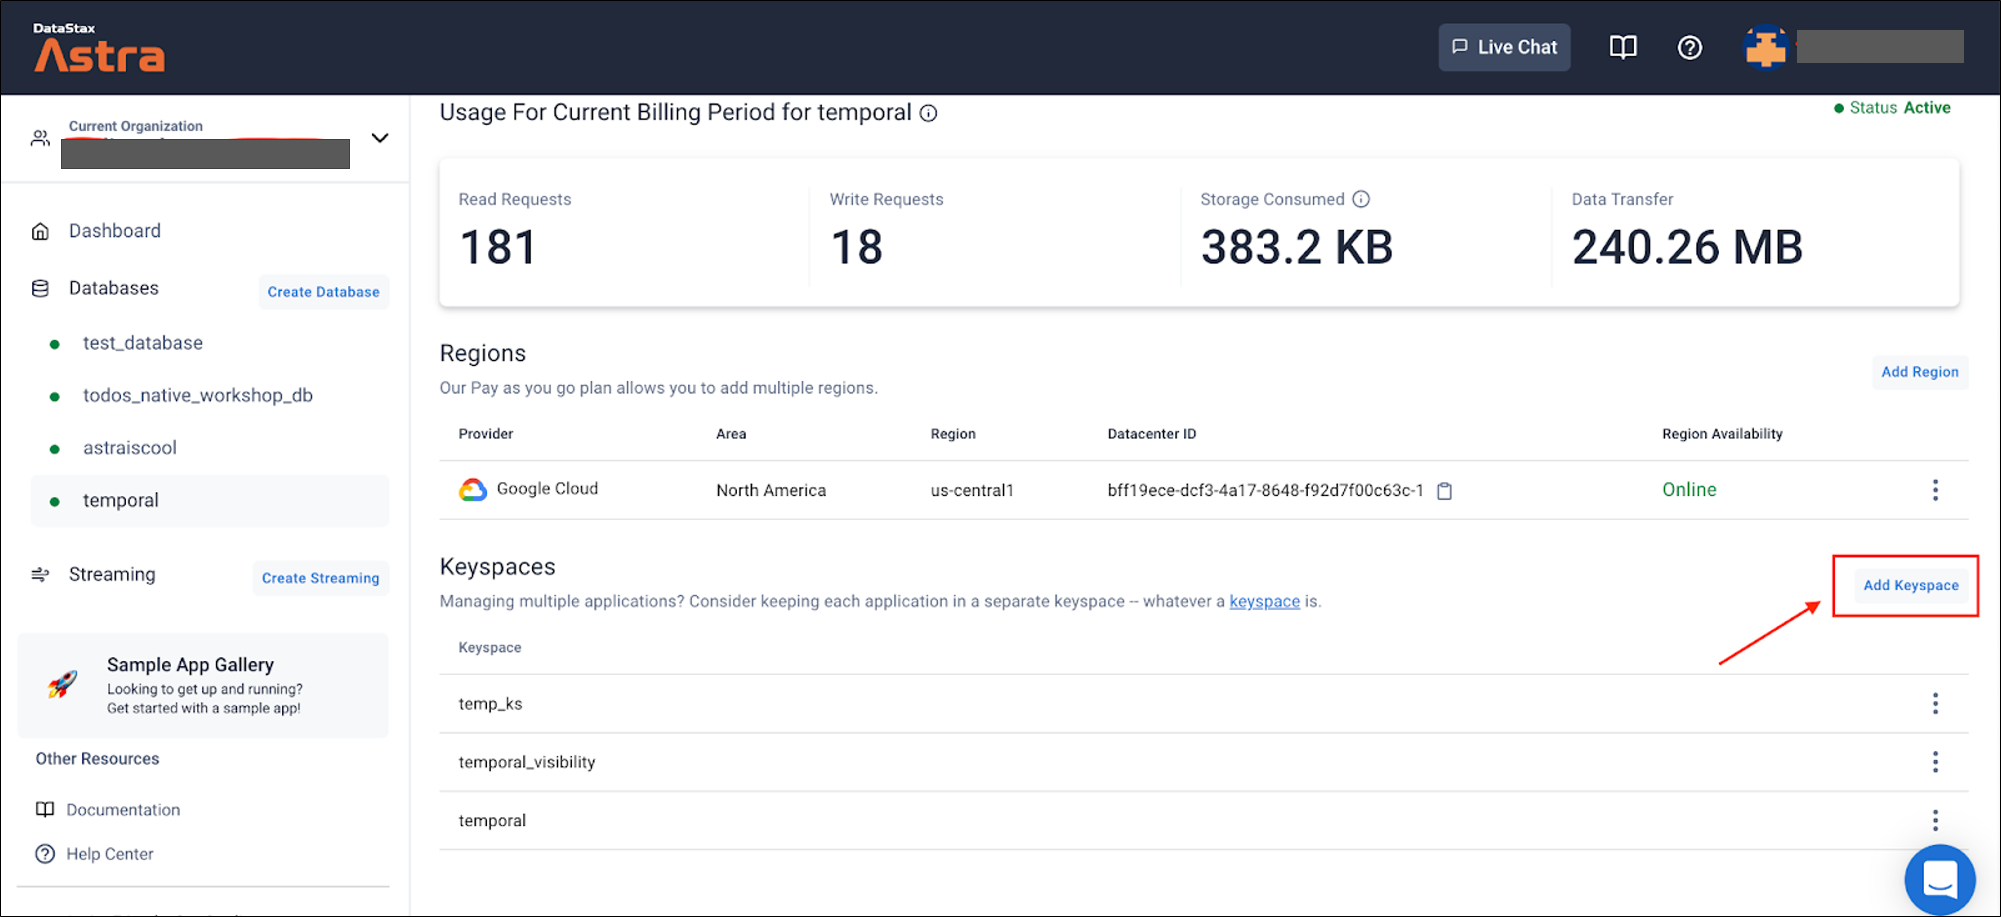
Figure 1. Screenshot of Astra DB dashboard and where to add the keyspaces.
Tokens are required to authenticate against Astra with APIs or Drivers. These tokens can be used with multiple databases and can be configured to have specific permissions. In this example, you will create a token with Admin Role.
Temporal uses this token to receive credentials and permission to access your database in a similar way to how Cassandra has a “user” and “password”, which we’ll discuss in more detail in Step 4 where you will configure the Persistence Layer in Temporal.
a) When you create your tokens, download the CSV file to keep these credentials.
3. Download your secure connect bundle ZIP
Download the secure connect bundle for the database that you created specifically for Temporal. These are unique to each database that you create within your Astra organization. This contains the information for Temporal to initialize a secured TLS connection between it and your Astra DB instance.
4. Find your Database ID
Lastly, you want to get your Database ID. You can find this in one of two ways:
a) Navigate to your your database and get the last ID in the URL: https://astra.datastax.com/org/.../database/xxxxxxxx-xxxx-xxxx-xxxx-xxxxxxxxxxxx
b) Copy and paste the “Datacenter ID” without the trailing -1 from the “Regions” section of your Astra Dashboard.
We recommend you create a central directory somewhere in your electronic filing system to keep track of all the files needed for this setup. For this example, we’re calling this main directory /my-temporal, the Secure Connect Bundle is secure-connect-temporal, and the CSV for token credentials is saved under adminuser (see Figure 2).
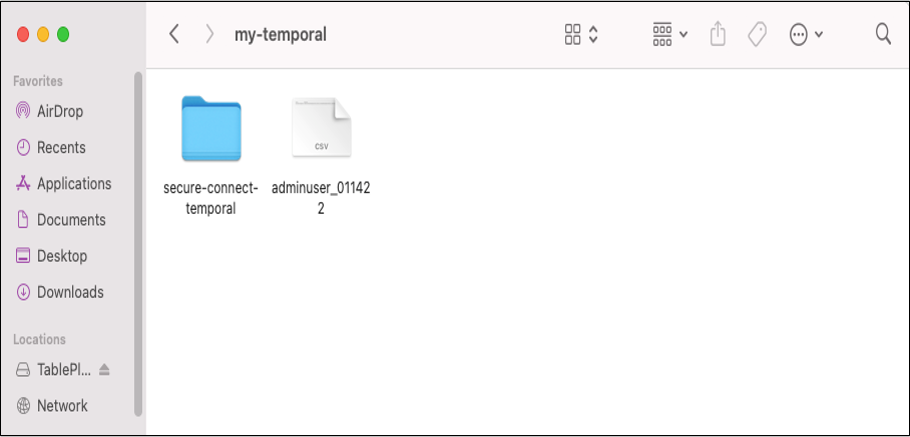
Figure 2. Example of a central directory to keep track of all the files needed for this setup.
Step 2. Temporal schema migration
Temporal offers a few ways to quickly install and deploy their server. For this example, we’re going to use both Docker and Helm Charts to get us connected with Astra DB. Follow the prerequisites (and just the prerequisites) for both Docker and Helm Charts to get you set up. In this step, you’ll build and set up the keyspaces you created earlier in Astra DB with temporal-cassandra-tool. This tool is part of the Temporal repo and relies on the schema definition.
1. Clone this GitHub repository.
2. Navigate to your cloned repository and using your preferred text editor (e.g. VisualStudio or Sublime), update the .env file with the Astra Token and Astra Database ID that you obtained above.
ASTRA_TOKEN=<your Astra token>
ASTRA_DATABASE_ID=<your DB ID>
3. Navigate to your cloned temporal-astra-cql-proxy directory.
4. Run the following commands to initialize the keyspaces that you created through Astra. Note that there are two sets of commands: one for temporal keyspace and one for temporal_visibility keyspace:
docker-compose -f docker-compose-schema.yaml run temporal-admin-tools \
  -ep cql-proxy -k temporal setup-schema -v 0.0
docker-compose -f docker-compose-schema.yaml run temporal-admin-tools \
  -ep cql-proxy -k temporal update-schema -d schema/cassandra/temporal/versioned/

docker-compose -f docker-compose-schema.yaml run temporal-admin-tools \
  -ep cql-proxy -k temporal_visibility setup-schema -v 0.0
docker-compose -f docker-compose-schema.yaml run temporal-admin-tools \
  -ep cql-proxy -k temporal_visibility update-schema -d schema/cassandra/visibility/versioned/
Once the process is complete, you should see a message similar to this:
2022-03-02T22:23:27.618Z INFO Validating connection to cassandra cluster. {"logging-call-at": "cqlclient.go:112"}

2022-03-02T22:42:53.526Z INFO Connection validation succeeded. {"logging-call-at": "cqlclient.go:118"}
2022-03-02T22:42:53.526Z INFO Starting schema setup {"config": {"SchemaFilePath":"","InitialVersion":"0.0","Overwrite":false,"DisableVersioning":false}, "logging-call-at": "setuptask.go:57"}
2022-03-02T22:42:53.526Z DEBUG Setting up version tables {"logging-call-at": "setuptask.go:67"}
2022-03-02T22:42:54.120Z DEBUG Current database schema version 1.6 is greater than initial schema version 0.0. Skip version upgrade {"logging-call-at": "setuptask.go:116"}
2022-03-02T22:42:54.120Z INFO Schema setup complete {"logging-call-at": "setuptask.go:131"}
Great! Your schemas have been migrated with Astra DB. You can double-check to make sure the correct tables have been created by querying your database in Astra DB’s CQL Console.
5. Lastly, navigate to your Astra DB CQL Console and run the following command to update the schema version being used. This will make sure that Temporal server and Astra are using compatible versions.UPDATE temporal.schema_version SET curr_version = '1.7' WHERE keyspace_name = 'temporal';
If you do a quick DESCRIBE tables in both your temporal and temporal_visibility keyspaces, you should see there are tables loaded in that were created by the schema migration:
token@cqlsh> use temporal;
token@cqlsh:temporal> desc tables;

history_node        tasks             cluster_metadata_info
cluster_membership  namespaces        cluster_metadata
schema_version      namespaces_by_id  schema_update_history
executions          queue_metadata
queue               history_tree

token@cqlsh:temporal> use temporal_visibility ;
token@cqlsh:temporal_visibility> desc tables;

open_executions  schema_update_history  schema_version  closed_executions
Step 3. Deployment configuration
In this section, you’re going to install Temporal using Helm Charts. Here’s how:
1. Refer to the Prerequisites that gives you the steps in configuring your system to access a K8s cluster, AWS CLI V2, kubectl, Helm v3, and so on. For this specific example, we used Kind to deploy our K8s cluster.
2. Clone the temporalio/helm-charts repository in your /my-temporal directory.
3. Download Helm Chart Dependencies. Your output should look like this:
% helm dependencies update
Getting updates for unmanaged Helm repositories...
...Successfully got an update from the "https://helm.elastic.co" chart repository
...Successfully got an update from the "https://grafana.github.io/helm-charts" chart repository
...Successfully got an update from the "https://prometheus-community.github.io/helm-charts" chart repository
...Successfully got an update from the "https://charts.helm.sh/incubator" chart repository
Hang tight while we grab the latest from your chart repositories...
...Successfully got an update from the "kong" chart repository
...Successfully got an update from the "datastax-examples-kong" chart repository
...Successfully got an update from the "bitnami" chart repository
Update Complete. ⎈Happy Helming!⎈
Saving 4 charts
Downloading cassandra from repo https://charts.helm.sh/incubator
Downloading prometheus from repo https://prometheus-community.github.io/helm-charts
Downloading elasticsearch from repo https://helm.elastic.co
Downloading grafana from repo <a href="https://grafana.github.io/helm-charts">https://grafana.github.io/helm-charts</a>
4. Create and deploy your K8s cluster using these instructions. Once deployed, the K8s cluster should appear up and running in your Docker Desktop.

Figure 3. Verify in the Docker Desktop that your Kubernetes cluster is up and running.
Secret creation
In the Docker Image step, you might have noticed that we used the following files from our Astra secure connect bundle: ca.crt, cert, and key. These are all credentials that will tell Temporal that you’re trying to connect with Astra DB and that you have the access to do so.
With Secrets in K8s, you can store sensitive information and mount it to your deployment.
1. Go to your /helm-charts file directory.
2. Open the templates folder.
3. Using your preferred text editor (we used VSCode) create an astra-secret.yaml file in this folder.
4. Copy and paste the following code in your editor:
apiVersion: v1
kind: Secret
metadata:
 name: astra-secret
type: Opaque
data:
 ca.crt: LS0tLS1CRUdJTiBDRV...
 cert: LS0tLS1CRUdJTiBDR....
 key: LS0tLS1CRUdJTiBSU...
5. Navigate to your Secure Connect Bundle in your /my-temporal directory using your terminal.
6. Base64 Encode your ca.crt, cert, and key files then plug them back into the respective fields in your astra-secret.yaml file ex. ca.crt: LS0tLS1CRUdJTiBDRV...
- Base64 for Mac:
base64 --break 0 <file-name> - Base64 for Windows:
certutil -encode input-file.txt encoded-output.txt - Base64 for Linux:
base64 -w o <path-to-file>
7. Save your astra-secret.yaml file.
Mounting to volume - server deployment
1. In your templates folder, find and open server-deployment.yaml
2. Append the following under volumeMounts:
volumeMounts:
           ….
           - name: astra-secret
             mountPath: /etc/temporal/secret
             readOnly: true
3. Scroll down to volumes and append the following:
volumes:
      …
       - name: astra-secret
         secret:
           secretName: astra-secret
           items:
             - key: cert
               path: cert
             - key: ca.crt
               path: ca.crt
             - key: key
               path: key
Note that the volumeMount name and volume name must be the same for astra-secret.
4. Save your server-development.yaml file.
Step 4. Persistence layer configuration
Now that you’ve gotten this far, we’re going to configure the Persistence Layer of Temporal’s server. The persistence layer, also known as the Data Access layer, is paired with the Temporal Server to allow support for different back-end databases—Cassandra, in this case.
1. Go to the helm-charts directory.
2. Go to the values folder.
3. Edit the values.cassandra.yaml file using your preferred editor (ie. VSCode).
4. Modify the contents under the cassandra sections for both temporal and temporal_visibility keyspaces as shown below:
cassandra:
         disableInitialHostLookup: true
         tls:
           enableHostVerification: false
           enabled: true
           certFile: "/etc/temporal/secret/cert"
           keyFile: "/etc/temporal/secret/key"
           caFile: "/etc/temporal/secret/ca.crt"
         hosts: <your-host-name> //from your config.json file from secure connect bundle
         port: 29042
         keyspace: temporal //"temporal_visibility" for visibility section
         user: "token"
         password: "<your-astra-token>" //can be found in CSV file under "Token" from step 1
         existingSecret: ""
         replicationFactor: 3
         consistency:
           default:
             consistency: "local_quorum"
             serialConsistency: "local_serial"
5. Save your values.cassandra.yaml file.
Helm install
Now it’s time to install and deploy Temporal Server.
1. In your helm-charts directory, run this command:
helm install -f values/values.cassandra.yaml --set elasticsearch.enabled=false temporalastra . --timeout 900s
You should see this message if it was successful:
NAME: temporalastra
LAST DEPLOYED: Thu Mar  3 15:34:39 2022
NAMESPACE: default
STATUS: deployed
REVISION: 1
TEST SUITE: None
NOTES:
To verify that Temporal has started, run:
  kubectl --namespace=default get pods -l "app.kubernetes.io/instance=temporalastra"
2. In a different tab, run:
kubectl --namespace=default get pods -l "app.kubernetes.io/instance=temporalastra"
A successful deployment should look like this:
NAME                                                  READY   STATUS    RESTARTS   AGE
temporalastra-admintools-5c5fb5f989-rhdrz           1/1     Running   0          14m
temporalastra-frontend-7767bcdddb-kxqsn             1/1     Running   0          14m
temporalastra-grafana-6bb965b6ff-5kdnq              1/1     Running   0          14m
temporalastra-history-5b798b4965-4sv6q              1/1     Running   0          14m
temporalastra-kube-state-metrics-84ff4fb4c8-lkjbr   1/1     Running   0          14m
temporalastra-matching-65b79bd899-xt6cb             1/1     Running   0          14m
temporalastra-web-7b6c8d64d7-xtqpb                  1/1     Running   0          14m
temporalastra-worker-6dc9568895-h6hkq               1/1     Running   0          14m
3. Allow a couple minutes for all STATUS to initialize and switch to Running. You can run the get pods statement from above to continuously check on the status as it’s initializing.
Step 5. Test and validate
You can test your connection and play with your Temporal cluster by following these instructions on GitHub. Temporal offers sample apps to test out different workflows in both Go and Java. You can use both of these to test and validate that your Temporal instance is successfully running.
1. Make sure to use tctl to create namespaces dedicated to certain workflows.
% kubectl exec -it services/temporalastra-admintools /bin/bash
bash-5.0# tctl --namespace test namespace re
Namespace test successfully registered.
2. Forward your machine’s local port to Temporal Web UI to view and access on your local host by running the following commands in a new window.
a) Expose your instance’s front end port to your local machine:
$ kubectl port-forward services/temporalastra-frontend-headless 7233:7233
Forwarding from 127.0.0.1:7233 -> 7233
Forwarding from [::1]:7233 -> 7233
b) Forward your local machine’s local port to the Temporal Web UI:
$ kubectl port-forward services/temporalastra-web 8088:8088
Forwarding from 127.0.0.1:8088 -> 8088
Forwarding from [::1]:8088 -> 8088
3. When using the sample apps, keep in mind that you want to modify the starter and worker code so that it points to this specific Temporal deployment. For example:c, err := client.NewClient(client.Options{HostPort: "127.0.0.1:7233", Namespace: "test"})
4. Once you have this all running, you should be able to see your workflows reflect on both the Astra UI and the Temporal UI by navigating to http://127.0.0.1:8088 on your browser.

Figure 4: Verifying that your workflows show up on both the Temporal UI and Astra UI.
And you’re all done!
At this point you should have a better idea of just how powerful a pairing Temporal and Astra DB can be. With this runbook and your free Astra DB account, you can go ahead and start experimenting with Temporal samples.
Subscribe to the DataStax Tech Blog for more developer stories like this. Also check out our DataStaxDevs YouTube channel for free tutorials and follow DataStax Developers on Twitter for the latest news about our developer community.
Resources
- Part 1: Easily Manage Workflows at Scale with Temporal.io and Astra DB
- Part 2: Connect Temporal.io to Astra DB in 5 Easy Steps with CQL-Proxy
- DataStax Astra DB | Cloud-Native Cassandra-as-a-Service
- How to quickly install a Temporal Cluster for testing and local development
- Temporal Helm charts
- Kubernetes
More Technology
View All
How to Build a Crystal Image Search App with Vector Search

Knowledge Graphs for RAG without a GraphDB