Deploy a Machine Learning Model REST API using Linode, Encryption, Docker & Astra DB (Part 2)

Pieter HumphreyDevelopers
Welcome to part 2 of our “AI as an API” series! In this post, you’ll learn how to configure a virtual machine and deploy your machine learning REST API using Linode, Docker, cryptography, and DataStax Astra DB.
If you haven’t yet gone through part 1, “How to Train a Machine Learning Model as a REST API and Build a Spam Classifier,” we highly recommend you do that. Part 1 covered how to:
- Create, train, and test a machine learning (ML) model and get it ready for production
- Prepare spam datasets for ML using Python, Jupyter Notebook, and Keras
- Train a Long Short-Term Memory (LSTM) ML model using Keras
- Convert the ML model into production-ready REST API with FastAPI
- Integrate AI as an API with Astra DB and test it with ngrok
Part 1 can seem like a straightforward process. But we do recommend going through it, so you’ve got all you need to deploy your AI as an API into production using a virtual machine.
This step-by-step video tutorial is taught by the founder of Coding for Entrepreneurs, Justin Mitchel, and sponsored by DataStax. It will show you how to:
- Provision a virtual machine and configure a virtual environment on a cloud provider
- Clone a public project and private repository
- Install Docker and configure Dockerfile
- Connect to Astra DB using cryptography
What you need to deploy your ML model
You’ll be working heavily with Python today. So it’s essential to have experience with classes, variables, functions, and running Python requests. If you need more training with Python, check out the Coding for Entrepreneurs’ 30 days of Python series.
You’ll also need the code for this tutorial on AI as an API Course Reference GitHub. Don’t forget to download and install the required technologies from this requirements.txt on GitHub.
The main technologies that you’ll work with today include:
- Astra DB, DataStax’s database-as-a-service built on Apache Cassandra®
- Linode, a cloud-computing platform
- Jupyter Notebook, a web-based interactive computing platform
- Docker, a set of platform as a service products that use OS-level virtualization to deliver software in packages called “containers”
1. Pick a cloud provider
Creating AI applications is a time-consuming and complex process. Cloud vendors simplify it by offering affordable APIs. Let’s begin by selecting a cloud provider for our production application. We have three criteria:
- Access to a virtual machine: it’s crucial to control everything about the environment your application runs on. Because we need to install the version of TensorFlow we want to load in our Keras model
- Ease of use: easy access to all needed resources so you can experiment extensively
- Access to a GPU: allows you to train the ML model on the cloud service
All things considered, we picked Linode as our cloud provider for this tutorial.
You can also use:
- Digital Ocean Droplet
- Amazon EC2
- Google Cloud Compute Engine
- Microsoft Azure Virtual Machines
- Raspberry Pi
We don’t recommend DigitalOcean App Platform or Heroku. Controlling the entire environment is either more complex or not possible.
If controlling the environment on the virtual machine from scratch sounds intimidating, don’t worry. In reality, it’s not that challenging. We’ll guide you through it in this tutorial with pre-set codes and in-depth instructions.
2. Set up your virtual machine
A virtual machine helps scale your machine learning model for production. You’ll set up your virtual machine and run the model on both local and virtual environments together. Here’s what you need to do:
- Generate a Secure Shell (SSH) key and load it to your cloud provider
- Provision your first virtual machine on the cloud provider
- Install GIT and Python PIP on your local and virtual machines
Now you’re ready to deploy the codes on AI as an API Course Reference GitHub into production. Follow the instructions in the video to clone them to your personal project. You can clone a private repository instead of the public project. Find a simple way to do this here.
3. Work with Docker
The next step is to install Docker on your virtual machine. Docker is a virtualization software for building, running, and managing containers on servers and the cloud.
Docker lets you easily reproduce the working environment used to train and run the ML model anywhere. It also ensures that our virtual and local environments are identical for both environments to work properly. Learn how to install Docker here and find a working example with nginx here.
Then, create a Dockerfile to get the REST API application running. A Dockerfile is a text document containing commands for Docker to correctly configure the environment. It’s similar to what we’ve been doing manually with our virtual machine.
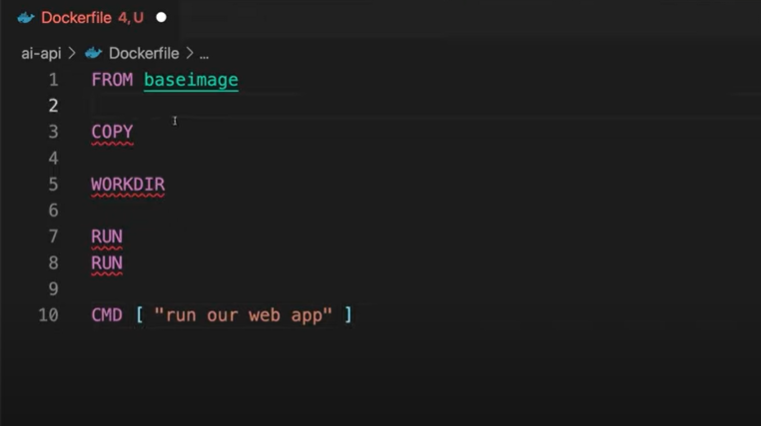 Figure 1: The Dockerfile configuration you need for this tutorial at the baseline level
Watch the video to add and configure the Dockerfile and build Docker project and enter Docker bash. Your Dockerfile should now run on your virtual machine. Next, add and activate environment variables to your virtual machine and Dockerfile for it to work on your production machine. Finally, activate the virtual machine and implement pypyr pipelines to automate this process.
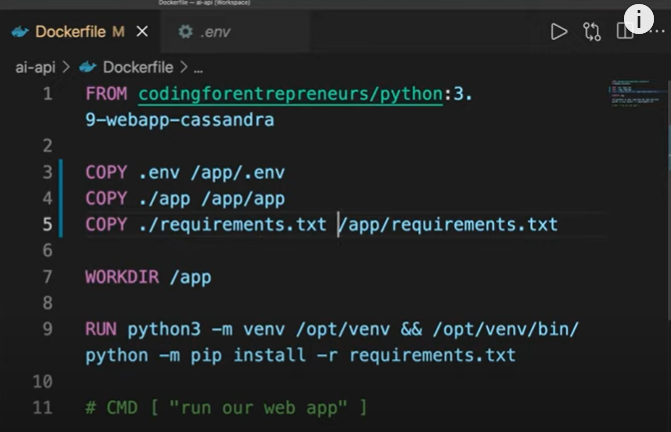
Figure 2: Dockerfile with environment variables
4. Connect Astra DB with cryptography
The last step before you run your ML application is to add the Astra DB connection to your Dockerfile. Here are the steps to do this with links to the exact time stamps in the video:
- Secure a directory with cryptography on Jupyter Notebook
- Convert what you did on Jupyter Notebook to an actual reusable encryption module
- Create pipelines for encryption and decryption
- Update the production environment with the encryption key
You should now have a production version of your AI as an API running and working. We tested the application out and it returned all the datasets that we stored in part 1.
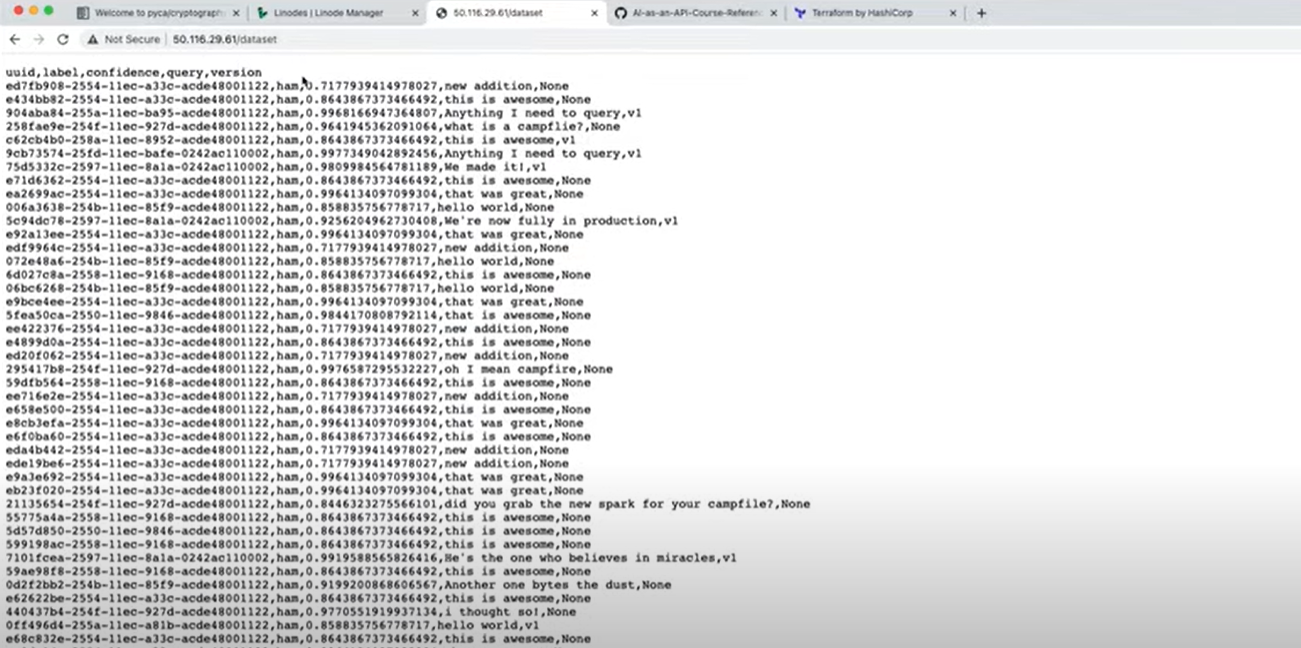
Figure 3: AI as an API production version
Conclusion
AI as an API service has countless applications in our everyday lives, from language processing to data discovery. This makes it a high-demand field.
If you’ve followed this tutorial, you’ve now seen how to deploy your AI as an API model into production using a virtual machine. A lot of this was done manually so you can learn the process in-depth. Once you’re familiar with the process, you can work towards automating it.
Our challenge for you from here is to create a new dataset, build and train a ML model, and launch your own REST API service. Check out How to Web Scrape on a Schedule with Apache Cassandra, FastAPI, and Python to help you manage database queries too.
Tag DataStax Developers on Twitter if you successfully completed this series – especially if you’re starting your own process from scratch. Check out our YouTube channel for tutorials and for the latest news about our developer community.
Resources
More Technology
View All
How to Build a Crystal Image Search App with Vector Search
Knowledge Graphs for RAG without a GraphDB